Pipe Leakage Scanner
Spider-MX™
Automatic Magnetic Flux Leakage Pipe Scanner
Spider-MX™ is the automated inspection tools for exposed pipes.
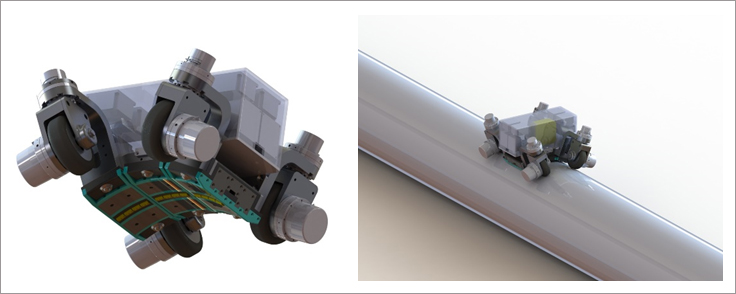
Spider-MX™ is the carrier system which sticks to the pipe wall using magnetic forces, scans the full coverage of the pipes, saves the data, and analyzes the data.
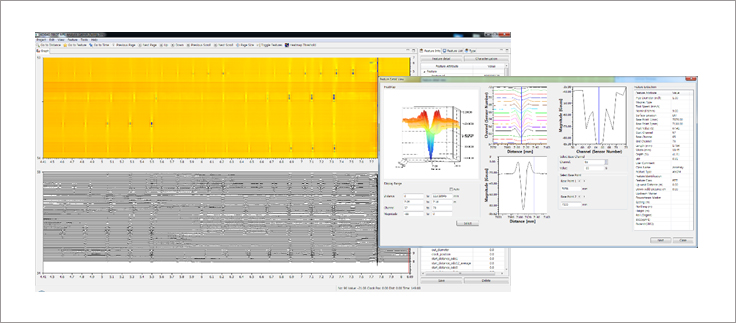
Spider-MX™ software analyzes the scanned data, measures the width, length, and depth of defects in pipes and provides assessment on risk of failure.

Key Features
- Uses proven MFL(Magnetic Flux Leakage) Technology
- Self-sticks to the pipes using magnetic forces without any additional installation
- Allows flexible (axial and circular) movement for obstacle detection and avoidance
- Plans path using IMU sensor
- Scans the entire pipe with high speed
- Displays the scanned data in real time
- Provides a final inspection report and risk assessment report
In-Line Inspection
- Magnetic flux leakage inspection is not affected by liquid flowing through pipe, so inspections can be carried out for both active and inactive pipes.
Surface temperature of the pipe should not be higher than 80 oC.
Metal loss Inspection : Measurement Principle
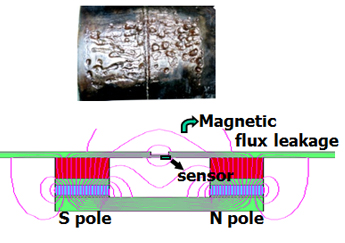
Magnetic Flux Leakage(MFL) detection technology was a widely proven technology for detecting the metal loss of pipeline.
Metal loss features in the wall of pipe, saturated with magnetic flux, will cause some of the magnetic field to leak out of the pipe.
This leakage field can be detected by sensor and used to analyze feature classification. PI& has developed the high resolution and most
sensitive metal loss inspection tools named Spider-MX™, based on MFL technology and applies exposed pipe inspection.
Spider-MX™ consists of the following system ;
Magnetization system
Automatic carrier system
Odometer system
IMU system
Data acquisition system and
Data analysis system

Technical Specification of Spider-MX™ |
|
|---|---|
Principle of operation |
Magnetic Flux Leakage |
Pipe diameter |
168 mm(6") to 2,000mm(80") – Outside Diameter |
Method of propulsion |
Automatic motor control |
Scan speed |
Max. 20 cm/sec |
Maximum wall thickness |
5 to 22 mm |
Test through coatings |
Yes, if non magnetic |
Maximum coating thickness |
5mm but accuracy of sizing is deteriorated |
Maximum of pipe surface temperature |
80 oC |
Power requirements |
48 V battery operation(portable) |
Testing time |
30 hours continuous working |
Tool weight |
Below 20 kg(depend on pipe diameter) |
Connecting cable |
Max. 100 m |
Full detection and sizing accuracy for metal loss feature
|
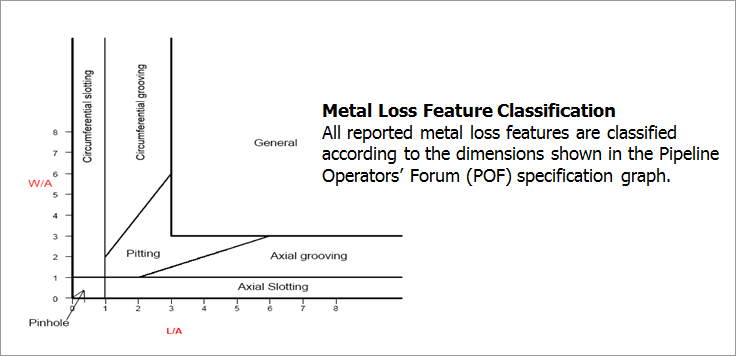
Pinhole |
Axial Slotting |
Circ. Slotting |
Pitting |
Axial Grooving |
Circ. Grooving |
General1 |
|---|---|---|---|---|---|---|---|
Depth at POD = 90% |
detectable |
detectable |
10% w.t |
10% w.t |
10% w.t |
10% w.t |
10% w.t |
Depth sizing accuracy |
N/A | N/A | ±10% w.t |
±10% w.t |
±10% w.t |
±10% w.t |
±10% w.t |
Length sizing accuracy |
±10 mm |
±10 mm |
±10 mm |
±10 mm |
±10 mm |
±10 mm |
±10 mm |
Width sizing accuracy |
±10 mm |
±10 mm |
±10 mm |
±10 mm |
±10 mm |
±20 mm |
±20 mm |
Full detection and sizing accuracy for metal loss features in girth weld or heat affected zone2
|
Pinhole |
Axial Slotting |
Circ. Slotting |
Pitting |
Axial Grooving |
Circ. Grooving |
General1 |
|---|---|---|---|---|---|---|---|
Depth at POD = 90% |
detectable |
detectable |
10% w.t |
10% w.t |
10% w.t |
10% w.t |
10% w.t |
Depth sizing accuracy at 80% confidence |
N/A | N/A | ±20% w.t |
±20% w.t |
±20% w.t |
±20% w.t |
±20% w.t |
Length sizing accuracy at 80% confidence |
±10 mm |
±10 mm |
±10 mm |
±10 mm |
±10 mm |
±10 mm |
±10 mm |
Width sizing accuracy at 80% confidence |
±10 mm |
±10 mm |
±10 mm |
±10 mm |
±10 mm |
±20 mm |
±20 mm |
1. The use of the term "General" in this context does not correspond to term " general corrosion" in any governmental regulations or industry recommended practices
2. If girth weld bead exist, detection and sizing accuracy is remarkably deteriorated.
3. If w.t<10mm, then A=10mm. Otherwise A=w.t

Spider-MX™ Software
- PI& also supply a softcopy reporting which enables clients to have full manipulation of the inspection data.
The SOFTWARE ensures clients to make the best use of Pipeline Data.
What software can do for you?
- Fingerprint of pipeline and symbolic pipe
- Customized list
- Several feature location sheet
- Visualized pipeline view contain all information of pipelines
- Pipeline tally
Benefits
- Full access to survey data and inspection results
- Systematic management of history of pipeline inspection
- Assistance on the planning of integrities of pipeline system
- Minimize data management cost
Spider-MX™ Reporting
The final inspection report shall contain the following information
- Tool operation data
- Pipe tally
- List of feature
- Summary and statistical data
- Fully assessed feature sheets
- Defect assessment method(repair sheets)

